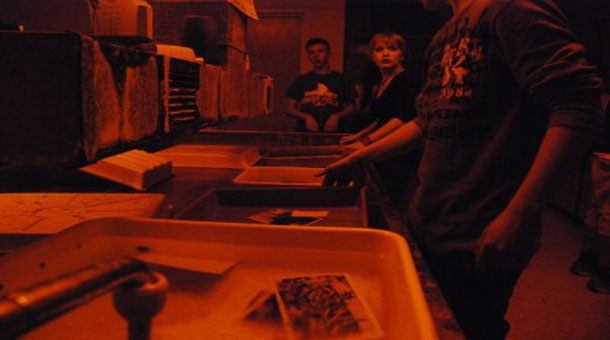
Deep inside the Room 222, a dark room full of magic and mystery awaits anyone who dares enter it to take on the challenge of making photos. Actually, the darkroom is no where near scary or mysterious, many people don’t even know it’s real purpose. A dark room is used in photography for the process of turning light-sensitive film into photos by using an enlarger, a lot of chemicals, and photo paper. One might be a little overwhelmed without having a clue where to begin.
Before you can enter the dark room it is necessary to load the film into a canister inside a pitch black room. Film is super sensitive to light and any ray of light that hits the film will turn it black forever. So after fumbling around and finally cramming all the film into a canister the next step is to exit the pitch black room to prepare the film for light exposure. This process can take 30 minutes or so because one must keep switching which chemical is in the canister and then wash it out to be able to move onto the next chemical. Finally, after taking the film out of the canister, now called negatives, one is now ready to enter the dark room.
The first glimpse into the dark room reveals several stations with big machines to occupy them and a huge sink in the middle with four trays inside. The big machines are enlargers, used to put photos on paper. When negatives are placed into the enlarger, the image that was on the negative is projected onto the surface below the enlarger. A timer must be set along with the correct level of brightness so the paper isn’t ruined. These levels are given by Photo Teacher Pat St. Louis before entering the dark room so there are no worries about being confused.
Many people might think that the dark room is also pitch black, but that is false. Photo paper is allowed only under yellow or orange light—anything else would ruin it. People can get pretty mad if a cell phone is whipped out right next to their paper. St. Louis requires all of his students to take tests over what is expected in the dark room before they are allowed to even enter. After passing the dark room test and becoming familiar with the surroundings in the room, one is now ready to begin pumping out photos.
Start off by moving to an empty enlarger and prepare paper for exposure. After tinkering with the enlarger settings, set the timer to about fifteen seconds. Flip the switch on the timer to start the exposure and have patience while the photo is magically put on paper. Now, take the blank paper and place it in the developer tray. Within thirty seconds you should see a photo begin to appear. If it comes out weird, or not all, then the settings must have been wrong on the enlarger, so the process must be restarted. If the photo comes out beautiful, it is safe to continue to the trays, leaving the photo in each tray for five to seven minutes. After the final tray, which is just plain old water, it’s safe to leave the dark room with the fancy new photo. It may sound like a long process but it is most definitely worth the effort to bring your pictures to life and the process becomes much easier after developing a few times.
Students who love the developing process can even invest in a personal dark room which can run them anywhere from $500 to $2,500. Some students even prefer to develop pictures over digital photography.
“I prefer to use old school photography because you actually have to know how to use your camera and it’s a lot more fun even though it can be hard at first,” junior Jocelyn Spivey said. South has had its dark room since the early 1970’s and continues to spawn excellent photos from its depths for years to come.


